
Greetings,
DISCLAIMER : Charging devices while the truck is off may drain your battery. I carry a 1500A jump starter box, just in case. I also just did this tonight, and wanted to write it up while it is fresh in my mind. Will post a reply if I kill my battery.
Test Subject : 2016 Nissan Frontier SV 4x4
Procedure : Install Always-On USB quick charger
Benefit : No cutting of any factory wires
Method : Obtain constant power from Electric Trailer brake pre-wiring
One of the things that has always bothered me about my Frontier is the fact that my phone can't charge while I run into the store, or any time the key is off. So, I installed a Quick Charge 3.0 dual USB charger from Amazon. I also made use of a Trailer Brake adapter harness, because I will probably never install electric trailer brakes in my truck. This way, I have a source of constant power, and there is no cutting into the truck's wires at all.
The Adapter is : CURT 51382 Brake Control Harness
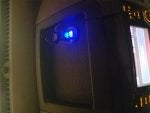
The charger I chose was:
Quick Charge 3.0 Car Charger, CHGeek 12V/24V 36W Waterproof Dual QC3.0 USB Fast Charger Socket Power Outlet with LED Digital Voltmeter for Marine, Boat, Motorcycle, Truck, Golf Cart and More (Black)
Procedure:
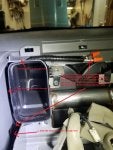
Plug Brake control harness into white plug to the right of the steering column up under the dash.
Identify by looking at the connector, which wires hook to Yellow (+12v) on the factory harness, and Black (Ground). It was odd to me, but on my harness, the wires in question were Black (+12) and White (Ground). I cut the other two wires, and taped them off inside of the wire loom that came with the harness. I then capped these two wires with temporary tiny orange wire nuts while I worked.
Remove the tray on top of the radio.
Remove the 3 visible screws. One in the top middle, and two off to the sides just above the radio.
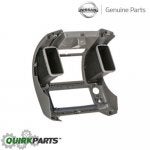
Pull straight back to release metal clips. (Ebay pic attached for Metal Clip location reference, so feel free to buy stuff from Quirkparts. )
)
See picture for how the Brake Control Harness wire is routed. You may be able to do this without unplugging any wires from the radio or climate controls, depending upon the size of your hands.
My charger required a 1-1/8" diameter hole. Measure yours before drilling.
After careful consideration, I chose to center the hole at 3rd dot from the right, by 4th dot from the rear (where rear is where the face of the radio is). This positions the charger where is has clearance from hitting the radio. I was originally going to put the charger in the front face of the trim, above the hazard lights, or replacing the passenger airbag off light, but the complexity of the plastic structure in those areas made me think again, and use the top tray (also cheaper if I screw it up) instead.
DISCLAIMER : Charging devices while the truck is off may drain your battery. I carry a 1500A jump starter box, just in case. I also just did this tonight, and wanted to write it up while it is fresh in my mind. Will post a reply if I kill my battery.
Test Subject : 2016 Nissan Frontier SV 4x4
Procedure : Install Always-On USB quick charger
Benefit : No cutting of any factory wires
Method : Obtain constant power from Electric Trailer brake pre-wiring
One of the things that has always bothered me about my Frontier is the fact that my phone can't charge while I run into the store, or any time the key is off. So, I installed a Quick Charge 3.0 dual USB charger from Amazon. I also made use of a Trailer Brake adapter harness, because I will probably never install electric trailer brakes in my truck. This way, I have a source of constant power, and there is no cutting into the truck's wires at all.
The Adapter is : CURT 51382 Brake Control Harness
The charger I chose was:
Quick Charge 3.0 Car Charger, CHGeek 12V/24V 36W Waterproof Dual QC3.0 USB Fast Charger Socket Power Outlet with LED Digital Voltmeter for Marine, Boat, Motorcycle, Truck, Golf Cart and More (Black)
Procedure:
Plug Brake control harness into white plug to the right of the steering column up under the dash.
Identify by looking at the connector, which wires hook to Yellow (+12v) on the factory harness, and Black (Ground). It was odd to me, but on my harness, the wires in question were Black (+12) and White (Ground). I cut the other two wires, and taped them off inside of the wire loom that came with the harness. I then capped these two wires with temporary tiny orange wire nuts while I worked.
Remove the tray on top of the radio.
Remove the 3 visible screws. One in the top middle, and two off to the sides just above the radio.
Pull straight back to release metal clips. (Ebay pic attached for Metal Clip location reference, so feel free to buy stuff from Quirkparts.
)See picture for how the Brake Control Harness wire is routed. You may be able to do this without unplugging any wires from the radio or climate controls, depending upon the size of your hands.
My charger required a 1-1/8" diameter hole. Measure yours before drilling.
After careful consideration, I chose to center the hole at 3rd dot from the right, by 4th dot from the rear (where rear is where the face of the radio is). This positions the charger where is has clearance from hitting the radio. I was originally going to put the charger in the front face of the trim, above the hazard lights, or replacing the passenger airbag off light, but the complexity of the plastic structure in those areas made me think again, and use the top tray (also cheaper if I screw it up) instead.