Nissan Frontier Forum banner

Added Backup Camera to Factory Radio '14 SV

51K views 52 replies 18 participants last post by  Oldchief  
#1 ·
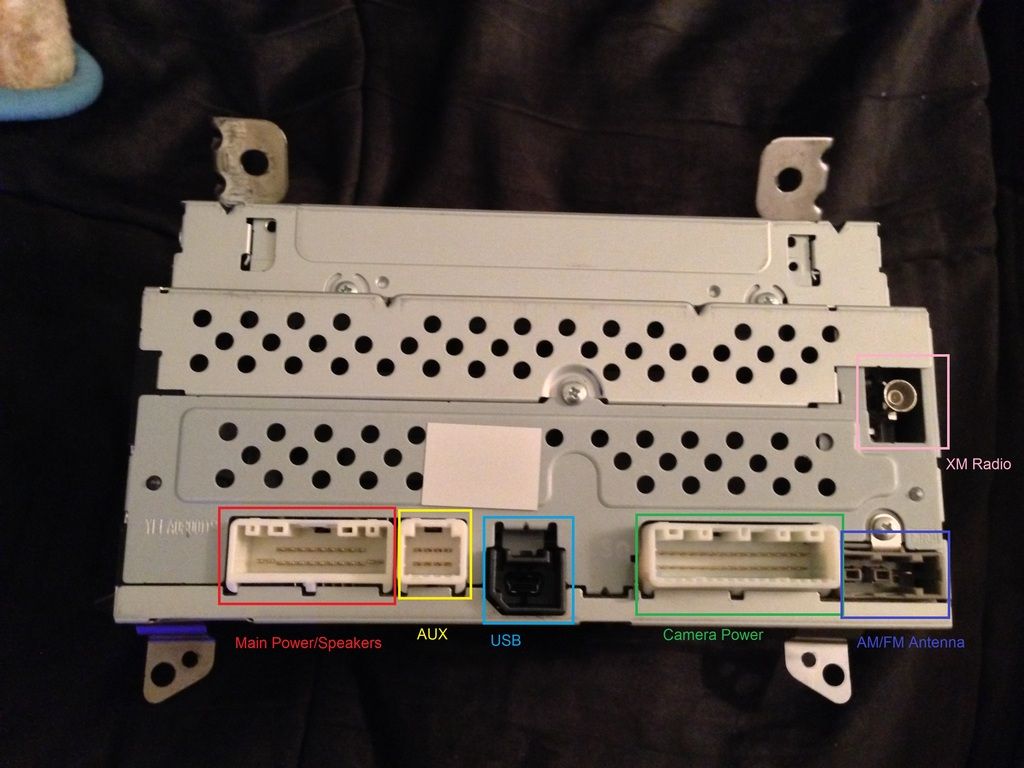
A small project I’ve taken on since truck ownership a little over a month ago was to install a backup camera to the factory radio. I really didn’t want to fool with aftermarket radios. That phase of my life is over. I just want stuff that works, sounds decent and is reliable. Just my preference. It’s my truck.

Having researched the different packages on the Frontier, I found the radio available on my SV (non-Value Truck Package, “VTP”) is the same product number from Bosch available on the SV VTP Frontier. So..... it was just a matter of wiring and plugging the right wires.

I was really just curious that I could actually make this work before finalizing the wiring, etc. So for $60, I figured, WTF? Why not try it.

After several hours of research online, I found that Mouser electronics does have 32 pin wiring connector, both male and female that mate to the Nissan connector and Bosch radio. It was just a matter of making the mate.

My first mistake was to assume the pins used were identical to those available through Mouser. They just don’t mesh well with the factory connector. So I ended up building a “jumper” harness between the factory 32 pin and the radio. AT the radio, I added the connections necessary to complete the install (pins 34, 36, 36, 44 and 50 at the M45 connector).

The only bit of advice I have here for anyone thinking of doing this is to take your time if you’ve never worked with production wiring connectors before. The little pins can be a royal pain to work with and you need some specialized tools. I took my time on each pin retrofit. I also checked continuity between the harnesses before the install.

I wanted to go the harness route for two reasons: 1) it’s easier to pinpoint if there were issues in my trial phase. 2) If I need to remove it in the future, I can just unplug the harness and return the radio to stock.


So parts used:

Mouser and manufacturers P/N:
1473799-1 (1x)
1318747-1 (1x)
1123343-1 (15x, wanted spares)
1376109-1 (15x, wanted spares)
A lot of patience, some spare wiring, solder, heat shrink, etc.
I did cannibalize a Scosche NN04RB for the gauge wire I wanted. I though this would be good for the connectors on the ends during my initial foray, but I was wrong, they are the incorrect gauge to just plug into the factory 32 pin harness. But the colored wire was helpful.
Camera was Esky EC170-08 (available from several sources)

You can also cross reference the part numbers via the TE Connectivity Electronics website as well as view several informative .PDFs and other digrams.


The remaining parts are the easy stuff.... running wiring to the camera, tapping into the reverse circuit and buttoning everything up. That’s silly stuff.


(this image is sort of poor because I still have the protective blue "tape" on the camera from the manufacturer, and it's dark-ish outside).

Anyway, hope this helps someone out there with an SV non-VTP to add a backup camera.

I will probably make a more comprehensive install with wiring diagrams, etc. But for now, I’m excited. It’s the little things.....
 
#2 ·
I already have the camera in my 2015 (w/VTP), but this is a cool little project. What about the ultrasonic ranging?

Now what someone needs to do is figure out how to reprogram the HU so that it offers the option of passing voice input through to your Bluetooth-connected smart phone instead of the HU doing the speech-recognition itself. I lost a lot of Android app voice-activation/control functionality when I moved from my previous car's aftermarket Sony MEXBT3100P unit that did exactly that. I could not only place calls, I could activate and control my music, navigation app, etc via voice command without ever taking my eyes off the road, just by pressing a button and talking (plus a lot of custom stuff I threw together via Tasker scripting).

Now, I can only make/answer calls and have texts read to me (yeah, yeah, yeah...and I can get my sister-in-law's latest Facebook status updates read to me too....yippee :serious:)
 
#3 ·
nice hack

So I ended up building a “jumper” harness between the factory 32 pin and the radio. AT the radio, I added the connections necessary to complete the install (pins 34, 36, 36, 44 and 50 at the M45 connector).
Schematics/diagrams would be helpfull...

Soooo... the typo above, is that 34,35,36,44,50?
what signal lines are they?

Just would be helpful for anyone wanting to follow you into the breach...

This is a really awesome hack/mod. With the associated writeup this could be stickied...
::wink::
 
#5 ·
Schematics/diagrams would be helpfull...

Soooo... the typo above, is that 34,35,36,44,50?
what signal lines are they?
Yeah, sorry about that. I have gotten too busy over the past few days to really fool with it more, take photos and create a good thread with better install instructions.

Essentially, it boils down to the following (and yes, you're right, I typed the 35 incorrectly, sorry! :))

  • 34 is the camera power circuit feed (in my case, red wire into the camera)
  • 35 is the camera video output (in my case, yellow wire into the camera)
  • 36 is the camera video ground (in my case, black wire in the same jacketing as the yellow wire)
  • 44 is the camera power circuit ground (in my case black in the same jacketing as the red wire)
  • 50 is the power trigger. This is either from the reverse circuit on the trans or wired in via switch. The radio needs to see 12V on this wire to switch modes and illuminate the screen to the camera.

The problem with the Leaf forum is that radio and electronics system is more complicated. You really need to trick the thing into adding a camera. But thank you to Joe for adding the link to the install. I read through that forum thread a while ago and figured it'd be worth trying on the Frontier.

The radios on the SV and SV VTP trucks are the same Bosch part number, so they just need the wiring connected (pretty easily).

At some point later this week I will have a chance to finish the install, take better photos, add some schematics and make a decent thread out of it.

Thanks for reading and the input! ::smile::::smile::
 
#7 ·
Damn that's cool thanks for sharing. I wondered if it were possible. Wish I was more confident in my ability to pull it off
 
#39 ·
same here

it would be cool is Metra or a company like that would make a harness like that with a composite input for the camera ans a lead for the reverse signal
 
#10 ·
That's the tough part about the terminals.... the tools for them are very expensive. I used a work around with the tools I have. I've worked with these little terminals before and know what a pain they can be because they are so small and fit very precisely into their connectors. At last check, the "proper" hand tool for these with interchangeable dies was around $1200 retail.

I ended up using three tools, primarily, after starting with several more. I found these worked best. It turned into a three-phase install for each wire, but the terminals look like they were crimped with the actual tool.

  1. Matco PEC7B End Cutter - used verrrrry carefully to make the initial crimp for the wire connection at the terminal and then the wire jacketing lock.
  2. Kronus 64-083 Automatic Wire strippers - these have some standardized crimping capability I also used very carefully with the terminals after the initial light crimp with the end cutters (above). I also used these primarily for the final testing and adjustment in each connector.
  3. Lisle 57750 Wire Terminal Tool Kit - very nice to have around if anything gets bent or you have to straighten part of a terminal or anything.

I did have a few other adjustment tools around for each terminal, regular pliers, offset/angled pliers, a razor knife and a lot of patience. I'd do a couple terminals, take a break, do a few more later, etc. It's easy to get frustrated with them.


The biggest thing to keep in mind with the terminals is just test fitting them to ensure they will enter the connector properly and get locked in there securely. This is also where having the Lisle terminal kit helps.
 
#15 ·
Looks like its possible to Connect an OEM backup camera to a 2015 Frontier With Factory Radio ( NO NAV version)
I found the proof,, a 2015 frontier for sale, with all the Goodies, No Nav, but rear view camera through the DASH!

It took me all night to find that Picture

Good News, because,, this is what I want to do for Now! it should be around 200 dollar upgrade to add OEM camera to existing Factory Stereo, just have to bridge the wires properly, We need to do a Guide on this!
 

Attachments

#19 · (Edited)
Good News, because,, this is what I want to do for Now! it should be around 200 dollar upgrade to add OEM camera to existing Factory Stereo, just have to bridge the wires properly, We need to do a Guide on this!
Around $200 for OEM? Is that from your local dealer or did you find it elsewhere? I called the Nissan dealer where I bought my truck and they told me it was $430 for the camera alone not including the bracket

what details do you need? Basically this is putting in a bridging harness so you don't have to cut up the stock harness.

I wanted to know if this harness is sold or if it's something I have to make and if there is any programing needed for the factory radio to receive the camera signal?
 
#20 ·
Can't speak to the OEM camera in the tailgate handle, other than it's expensive and limits your ability to remove the tailgate when needed. Its a bit more involved with the wiring harness. As for the harness that OP created, its something you have to make. FMR_GMC did a pretty bang-up job detailing what you need & what you have to do to make the bridge. Or you can splice into the factory harness, the 5 lines he's described. If you are using an OEM camera & harness, you'd likely need to get the harness(intermediate harness) that runs from the cab to the back of the truck. Mine does not have the intermediate harness, for example.
My plan is to use an aftermarket camera. With that, the important lines are 35/36 (camera video input) & 50 (12v into headunit. This is from the Reverse switch, to tell the headunit to display video) Camera can get its power& ground from a tail light housing Reverse light.
This is not a simple plug&play, it does take a little wiring knowledge/experience. But if you/a friend has experience, it's not too daunting a project. I'm considering getting a new headunit so I can have 2 video inputs -have a reverse cam & a nose rock cam.
 
#24 ·
Yeah I can upload pictures. I have a 2014 Nissan Frontier SV Crew Cab. The radio is the same color screen in this write up. As for testing the camera no I didnt test it. Question though the screen never changed from the radio screen amd I figured itd go to a blank screen if pin 50 had voltage the screen would flip to a blank powered screen. Meaning flipping to a black screen with back light.

Ill test camera asap.
 
#25 ·
Ummm. If the camera shows video on another display. Then Thats weird. I will be doing the same mod. On a 2015 frontier SV. With the no navigation stereo. Hope that adding 12v. To pin 50 doesnt burn out the stereo lol. I'll post an update soon.
 
#28 ·
Good news everyone! The test was a success. I ran a 12v cable to pin 50 on my radio and it popped up a message like "The backup cam wasn't detected, make sure your tailgaite is attached". I picked up a backup camera off Amazon and was trying to fiddle with it and paperclips in the right ports but it's 3 loose wires bouncing around and I'm not feeling 100% safe lol. I ordered 20 of the little pins from Mouser and they already shipped (I only need 3 but at a few pennies each why not have spares). So when they come in I'll get it working, take pictures, and post up a DIY for an aftermarket camera with the lower end radio for anyone interested.
 
#29 · (Edited)
So I learned a few things today.

#1 The Mouser pins might work with the aftermarket Mouser wiring harness but they will not work with the factory harness (pic of my ghetto test run below)
http://i.imgur.com/dyZB0ou.jpg

#2 You need to have the camera tied in to the power/ground (34/44) otherwise it will think your tailgate is off (might just need the ground connected to something) Note the power line only gives voltage when you are in reverse(pin 50 has 12 volts)
http://i.imgur.com/l8K7Y5J.jpg

#3 Everything works as it should on my test run (without a harness)! So I'm just going to order the parts that were originally suggested for the other stereo in the original post and it will be good to go. (after running cables and mounting the camera)
http://i.imgur.com/oLQ4dl1.jpg

So going to order those parts from Mouser but have to go out of town next week so it's gonna take a bit before I can go at it again.

Edit: Not going to bump this thread again or make my own. But I have it all working and everything is good.

I ended up ordering this cable:
because I needed to run 5 cables to the tailgate.

I also ordered all the Mouser parts the OP suggested. I made my own jumper harness and then ran the ribbon cable behind the dash, under the driver carpet, out the rear vent by the tailgate, then followed the factory wiring to the trailer hitch. Connected all the wires to the proper places and it was done.

If you do this be careful making your jumper harness! I had a heck of a time with it and ended up breaking the first harness I tried making (thank goodness i ordered 2). The plastic bends/cracks real easy and once that happens you have metal pins touching each other causing shorts.

I'm not sure I'm happy with where it's mounted right now. I have it right to the left of the trailer hitch and seems too low. Part of the top of the picture is cut off b/c of the bumper in the way. It's just zip tied right now so going to move it around until I have it where I like it then screwing it down.

Thanks again OP for making the diagrams and explaining how it all gets setup.

Image
 
#30 ·
Reverse Wire in Cab

Hi All,

I'm new to the forum. Thanks for all of the great info! I hooked up a reverse camera to my 2015 frontier. Slightly different, instead of running it through the stereo screen, I'm running it to a rear view mirror. Not to get this thread off-topic but you all have mentioned using pin 50 with a 12v wire to signal when in reverse to switch to camera mode. I need to do that same thing. How are you guys getting that signal?

I used the add-a-fuse / add-a-circuit to get the main power but I can't find a fuse in the cab to tell it when the car is in reverse. I figure you have to do the same thing for this mod so hopefully you know where to tap into that.

Thanks!
 
#31 ·
#32 ·
Follow up

Quick question. I am pretty clear on the radio head unit side wiring. The question I have is, is the OEM camera harness stubbed out with the OEM clip in the tailgate and body? Or do I need to run a harness from the tail to the cab? My plan is to go with the OEM camera, and make the 20 pin plug adapter as described, but I'm not clear on the tail side of the installation.

thanks for any help.
 
#34 ·
Quick question. I am pretty clear on the radio head unit side wiring. The question I have is, is the OEM camera harness stubbed out with the OEM clip in the tailgate and body? Or do I need to run a harness from the tail to the cab? My plan is to go with the OEM camera, and make the 20 pin plug adapter as described, but I'm not clear on the tail side of the installation.

thanks for any help.
My 2014 SV did not have the harness on the truck. You will likely have to run your own harness.
 
#33 ·
I would like to know if this would work with a 2017 Frontier factory radio before I start screwing with it

I would love to retain the stock head unit and make this work with a back up camera
 
#35 ·
it was found that nissan changed HU in '15 so you will need to verify that the wiring is still the same. I think it is, as aftermarket harnesses claim to fit from '10-current, but I have not researched wiring.