
Hey All,
I haven't posted much but I visit the forum weekly for future project ideas and information. First, I'd like to say thanks for all the technical info out there from everyone.
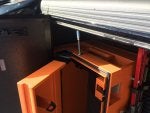
I haven't had much useful to contribute before, but finally I have finished something I feel share-worthy. I have been trying to figure out an in bed toolbox for a while now. I wanted something that would fit under my tri-fold bed cover that could be opened up with the bed cover folded up, something that was easy(ish) to remove for when I have a bike in the bed or something else large, and something that was (very close if not 100%) waterproof, even if it were in the bed with the tri-fold off. After browsing online I came across a post in Tacomaworld with a picture of a guy that used a toolbox from a step-side Ranger that fit perfectly in the bed and fit under the bed cover. Days of searching later, I could not find an "over the rail" style toolbox that would fit in our beds, around the wheel wells, and under a bed cover for any decent price. Fast forward a while and the results are as follows: (see images below)
I used a job box type toolbox that fit perfectly between the wheel wells. It's right at 42" or so wide and 20" front to back, and the best part, once I had cut the feet off the bottom of the box, is that it fit under my bed cover, kinda. In order to get the first section of my bed cover to close completely I had to trim part of the aluminum brace that goes left to right at that hinge area (bottom side of bed cover). I also had to add a hinge across the lid of the toolbox that would bring the pivot point of the lid further to the rear of the bed so that the lid could open with the bed cover folded up. For this I riveted in a piano hinge from left to right after ripping a nice cut across this brand new box. That was nerve wracking. For weatherproofing I used a few strips of extra wide gorilla tape over top of the hinge. While doing this I heated the tape some with a heat gun to help the glue settle and stick. I also was sure to open and close the new lid many times while adding tape to make sure function wasn't affected. To secure the rear section of lid so it wouldn't try to open I used the existing lid prop brackets and bolted them to the existing lower brackets. I know that is confusing to read, hopefully it's visible and makes sense with the pictures (zoom in on the 4th picture). To bolt in the box I used bigA eye bolts and all thread that go through each side of the box and hooks to the front bed cleats. On the inside of where the all thread goes through the box I used some big flat washers and a lock washer with the nut. I did the same on the outside of the box to sandwich the box to the all thread with the flat washers.I also had to modify the lock catches and openings a little with a dremel tool as the new angle of the lid opening caused interference.
This is something that took me about 20 hours to complete, as half way through the original plan we realized we would have to back track and make some changes. Either way it is definitely an all day, maybe even weekend event. Let me know what you guys and gals think. I'm sure I left stuff out, so if there are any questions feel free to ask.
As an FYI, for anyone who may do this, I am pretty sure the box is powdercoated, as when I spray painted a few edges that had been exposed when cut I was able to wipe away overspray with a rag and brake cleaner with no ill effects to the orange paint.
Oh and the box says "Frontier" on the front! Added bonus! :thumbsup:
Here is a link to the box I used:
https://www.homedepot.com/p/Frontie...x-JSB422020/304734478?MERCH=REC-_-PIPHorizontal3_rr-_-304734563-_-304734478-_-N
Sorry the last pic. is rotated.
I haven't posted much but I visit the forum weekly for future project ideas and information. First, I'd like to say thanks for all the technical info out there from everyone.
I haven't had much useful to contribute before, but finally I have finished something I feel share-worthy. I have been trying to figure out an in bed toolbox for a while now. I wanted something that would fit under my tri-fold bed cover that could be opened up with the bed cover folded up, something that was easy(ish) to remove for when I have a bike in the bed or something else large, and something that was (very close if not 100%) waterproof, even if it were in the bed with the tri-fold off. After browsing online I came across a post in Tacomaworld with a picture of a guy that used a toolbox from a step-side Ranger that fit perfectly in the bed and fit under the bed cover. Days of searching later, I could not find an "over the rail" style toolbox that would fit in our beds, around the wheel wells, and under a bed cover for any decent price. Fast forward a while and the results are as follows: (see images below)
I used a job box type toolbox that fit perfectly between the wheel wells. It's right at 42" or so wide and 20" front to back, and the best part, once I had cut the feet off the bottom of the box, is that it fit under my bed cover, kinda. In order to get the first section of my bed cover to close completely I had to trim part of the aluminum brace that goes left to right at that hinge area (bottom side of bed cover). I also had to add a hinge across the lid of the toolbox that would bring the pivot point of the lid further to the rear of the bed so that the lid could open with the bed cover folded up. For this I riveted in a piano hinge from left to right after ripping a nice cut across this brand new box. That was nerve wracking. For weatherproofing I used a few strips of extra wide gorilla tape over top of the hinge. While doing this I heated the tape some with a heat gun to help the glue settle and stick. I also was sure to open and close the new lid many times while adding tape to make sure function wasn't affected. To secure the rear section of lid so it wouldn't try to open I used the existing lid prop brackets and bolted them to the existing lower brackets. I know that is confusing to read, hopefully it's visible and makes sense with the pictures (zoom in on the 4th picture). To bolt in the box I used bigA eye bolts and all thread that go through each side of the box and hooks to the front bed cleats. On the inside of where the all thread goes through the box I used some big flat washers and a lock washer with the nut. I did the same on the outside of the box to sandwich the box to the all thread with the flat washers.I also had to modify the lock catches and openings a little with a dremel tool as the new angle of the lid opening caused interference.
This is something that took me about 20 hours to complete, as half way through the original plan we realized we would have to back track and make some changes. Either way it is definitely an all day, maybe even weekend event. Let me know what you guys and gals think. I'm sure I left stuff out, so if there are any questions feel free to ask.
As an FYI, for anyone who may do this, I am pretty sure the box is powdercoated, as when I spray painted a few edges that had been exposed when cut I was able to wipe away overspray with a rag and brake cleaner with no ill effects to the orange paint.
Oh and the box says "Frontier" on the front! Added bonus! :thumbsup:
Here is a link to the box I used:
https://www.homedepot.com/p/Frontie...x-JSB422020/304734478?MERCH=REC-_-PIPHorizontal3_rr-_-304734563-_-304734478-_-N
Sorry the last pic. is rotated.