Nissan Frontier Forum banner

My radiator R&R

3.1K views 14 replies 7 participants last post by  CT_Nismo  
#1 ·
A few weeks back, my radiator failed in a shower of coolant. I have been slow playing the repair for various reasons. The main one is weather as it is still cold in the northleast. All my work so far as been in my garage where the lighting is not so good. The purpose of this thread is to point out issues I have encountered along the way.

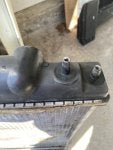
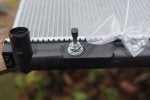
The old radiator is held to the frame by two mounting saddles on the topside. Rather simple. The top of the radiator has two locating studs that engages the saddles. I broke one when taking the radiator out. I was not rough with it: it just broke somehow. See the attached photos.

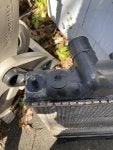
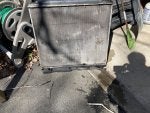
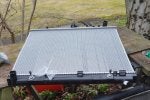
The two photos show the failure mode for the radiator. The metal radiator joint on one side is peeled away from the upper plenum. It lasted 17 years, not bad.
 

Attachments

#4 ·
I’m not sure about the foam being included. Home Depot has foam in a strip to seal the window mounted air conditioners. It’s in the weather stripping section.

Clint
 
  • Like
Reactions: idlafie and RamTest
#6 ·
@BLtheP is correct, the foam is there to seal the airflow so the air can only go thru the radiator, not around it. IIRC there was a foam on the top of mine as well (2007). The replacement radiator I installed never had either foam. It was not OEM, but a RockAuto offering. I used some self adhesive foam (window probably, as mentioned by @RamTest and @Clint) to fill the gaps. Don't know if it helped or not, but on the 100F+ days here in north Texas, I never experienced any heating issues.

Regarding the broken stud. This illustrates EXACTLY how brittle these plastic tanks get over the years. I am an advocate for replacing these plastic tank radiators every 10 years/150k miles. It's not terribly hard or expensive but can really prevent catastrophic damage and inconvenience later on.
 
#7 ·
@BLtheP is correct, the foam is there to seal the airflow so the air can only go thru the radiator, not around it. IIRC there was a foam on the top of mine as well (2007). The replacement radiator I installed never had either foam. It was not OEM, but a RockAuto offering. I used some self adhesive foam (window probably, as mentioned by @RamTest and @Clint) to fill the gaps. Don't know if it helped or not, but on the 100F+ days here in north Texas, I never experienced any heating issues.

Regarding the broken stud. This illustrates EXACTLY how brittle these plastic tanks get over the years. I am an advocate for replacing these plastic tank radiators every 10 years/150k miles. It's not terribly hard or expensive but can really prevent catastrophic damage and inconvenience later on.
This makes sense. I will forego the foam as my new radiator has not been fouled by wear. When it does, it will be long gone.
 
#8 ·
Parts are slowing coming in for my radiator repair. The upper radiator hose is noteworthy. It is a Dayco 71765 bought on Amazon at a good price. The attached photos show the old hose and new side by side and on top of each other. It seems the new one is not a perfect fit. It may be that perfection can only be achieved with an OEM hose. What to do? if push came to shove I can shorten the new hose and have almost a perfect fit. Or I can jam the new hose onto the radiator.

It seems to me that this hose is marketed for the Frontier but probably fits other vehicles. Perhaps this is how they can sell them cheaply.
 

Attachments

#12 ·
The new radiator was received today, see the attached photos. First impression is that the new one is lighter than the old radiator. The answer is in the side view of the two which shows the old and new side by side. The new one is not as wide. I'm short about 20% heat transfer area and probably lost 10% for the AT circuit. But I am not worried as new heat transfer surfaces are clean and will transfer heat much better than my 17 yo radiator.

The new radiator comes with AT nipples. Because I have an M, I don't need these. I can see them getting in the way of the shroud. What is the best way to remove these nipples. Just take the nipples off and leave two holes in the plenum? Or should I try and close out the plenum ports?
 

Attachments